
How to Configure Yealink DECT Series
 (Configure Yealink W80B for 3CX)
Yealink W60B, W70B, W75DM, W80DM, W90DM
- Step 1: Upgrade your Yealink DECT Base and Handsets to the Required Firmware
- Step 2: Factory Reset the Yealink DECT System
- Step 3: Add a Yealink DECT Base in 3CX and Assign Users to the Handsets
- Step 4: ONLY for Yealink W80 and W90 DECT Manager Base Stations
- Step 5: Register the Yealink Handsets & Assign them to the Users
- Known Limitations
- See also
Step 1: Upgrade your Yealink DECT Base and Handsets to the Required Firmware
Ensure that your DECT device and handsets are running on the required firmware. To check which firmware the phones are running:
 (Upgrade Yealink DECT Base and Handsets Firmware)
- Access the official Yealink website and then click “Software”. Select your model and download the latest Firmware image file.
- Point your web browser to your Yealink DECT Manager IP address.
- Navigate to “Settings” > “Upgrade” > “Select and Upgrade Firmware”.
- Click “Browse” choose the firmware image file saved previously, and press “Upgrade.”
- If using the Yealink W80 or W90 repeat this step for all the Yealink Base Stations you will connect to the DECT Manager.
Note: The handset firmware is upgraded automatically as soon as it is registered for the first time. To manually upgrade the handset after registration, navigate from the handset screen to “Settings” > “Upgrade Firmware” and press “Upgrade”. Supported Handsets:
- Yealink W53H (v88.83.0.20 or later)
- Yealink W56H (v61.85.0.35 or later)
- Yealink W59R (v115.83.0.10 or later, also requires Base firmware v103.83.0.80 or newer)
- Yealink W73H
Step 2: Factory Reset the Yealink DECT System
Used devices have to be reset to factory defaults. To reset the device:
 (Reset Yealink W80B)
- Hold the device button for at least 20 seconds.
- Release the button.
- The device will now proceed to reset and reboot.
Step 3: Add a Yealink DECT Base in 3CX and Assign Users to the Handsets
 (Add a Yealink DECT phone in 3CX)
- Go to “Admin > Voice and Chat”.
- Click on “+Add DECT/FXS”.
- Select your model and enter the device’s MAC address then click ”Next”.
- Select the provisioning method according to your installation type:
- If your instance is in the cloud or outside of the office, choose “Connect via SBC / router phone” and choose the one local to your device, then click “Next”.
Important: The “Router Phone” or SBC must already be up and running. - If your installation is on-premises, choose “Local LAN / VPN” and choose your system FQDN or local IP, then click “Next”.
- Assign your users and click “Add DECT base station”.
 (Assign users to your DECT through the 3CX Web Client)
You will be able to assign more users after the set-up. Restart your device (unplug/plug). Once restarted, your DECT will be automatically provisioned.
If you have disabled RPS: a pop-up window will appear with the “Provisioning URL”. You need to copy this and enter it in the DECT base station web interface.
Point your web browser to the device’s IP address and log in with the default username and password “admin”.
Go to “Settings” > “Auto Provision” > “Server URL” and enter the provisioning link copied earlier.
Press “Confirm” at the bottom of the page, and then press “Auto Provision Now”.
Step 4: ONLY for Yealink W80 and W90 DECT Manager Base Stations
This step only needs to be done if you have a W80 or W90 base station.
 (Enter the DECT Manager’s IP address)
- Point your browser to the Base Station’s IP address and navigate to the “Base Mode” node.
- Enter the DECT Manager’s IP address in the Base Mode page and press “Confirm”
- Point your browser to your DECT Manager’s IP address
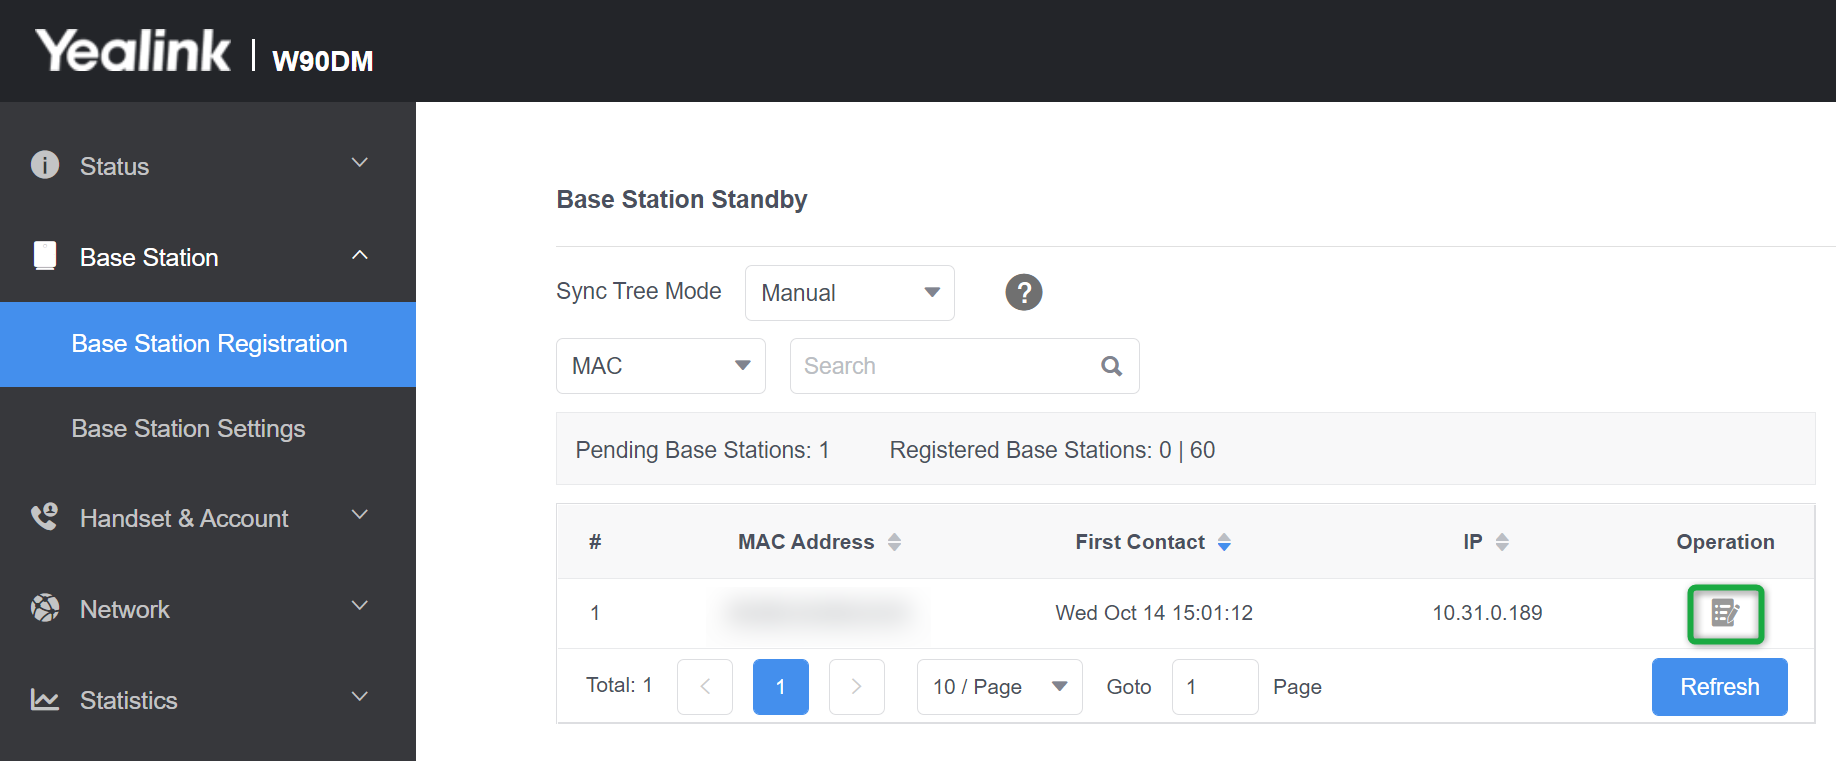
- Under the “Base Station Registration” page, click the ”Register” button next to the base you wish to connect to your DECT Manager, then press “OK”
- Navigate to the “Base Station Settings” and you should now see the base as “Active and synced
Step 5: Register the Yealink Handsets & Assign them to the Users
 (Registering handset for Yealink W80B DECT)
- Point your web browser to your device’s IP address and navigate to the “Handset & Account” > “Handset Registration” page.
- All the users’ extensions you assigned during the Step 3, will be listed here. Click the edit icon next to each extension.
- Click “Start Register Handset”.
- On your handset, press the Reg. softkey for “Easy Pairing” or alternatively, go to the Settings menu and select “Registration” > “Base 1”.
- Select your base from the scanning results list, and enter PIN “0000” when asked.
- Repeat the steps for all extensions you wish to assign a Handset.
 (Register handset for Yealink W80B DECT)
Known Limitations
- No Alert-Info.
- No CTI.
- No support for Paging Groups (incl. Multicast).
- Cannot park on shared parking spaces (SP0), only in parking orbit (*00).
- W60B is marked as EOL by the vendor.